Create an Account
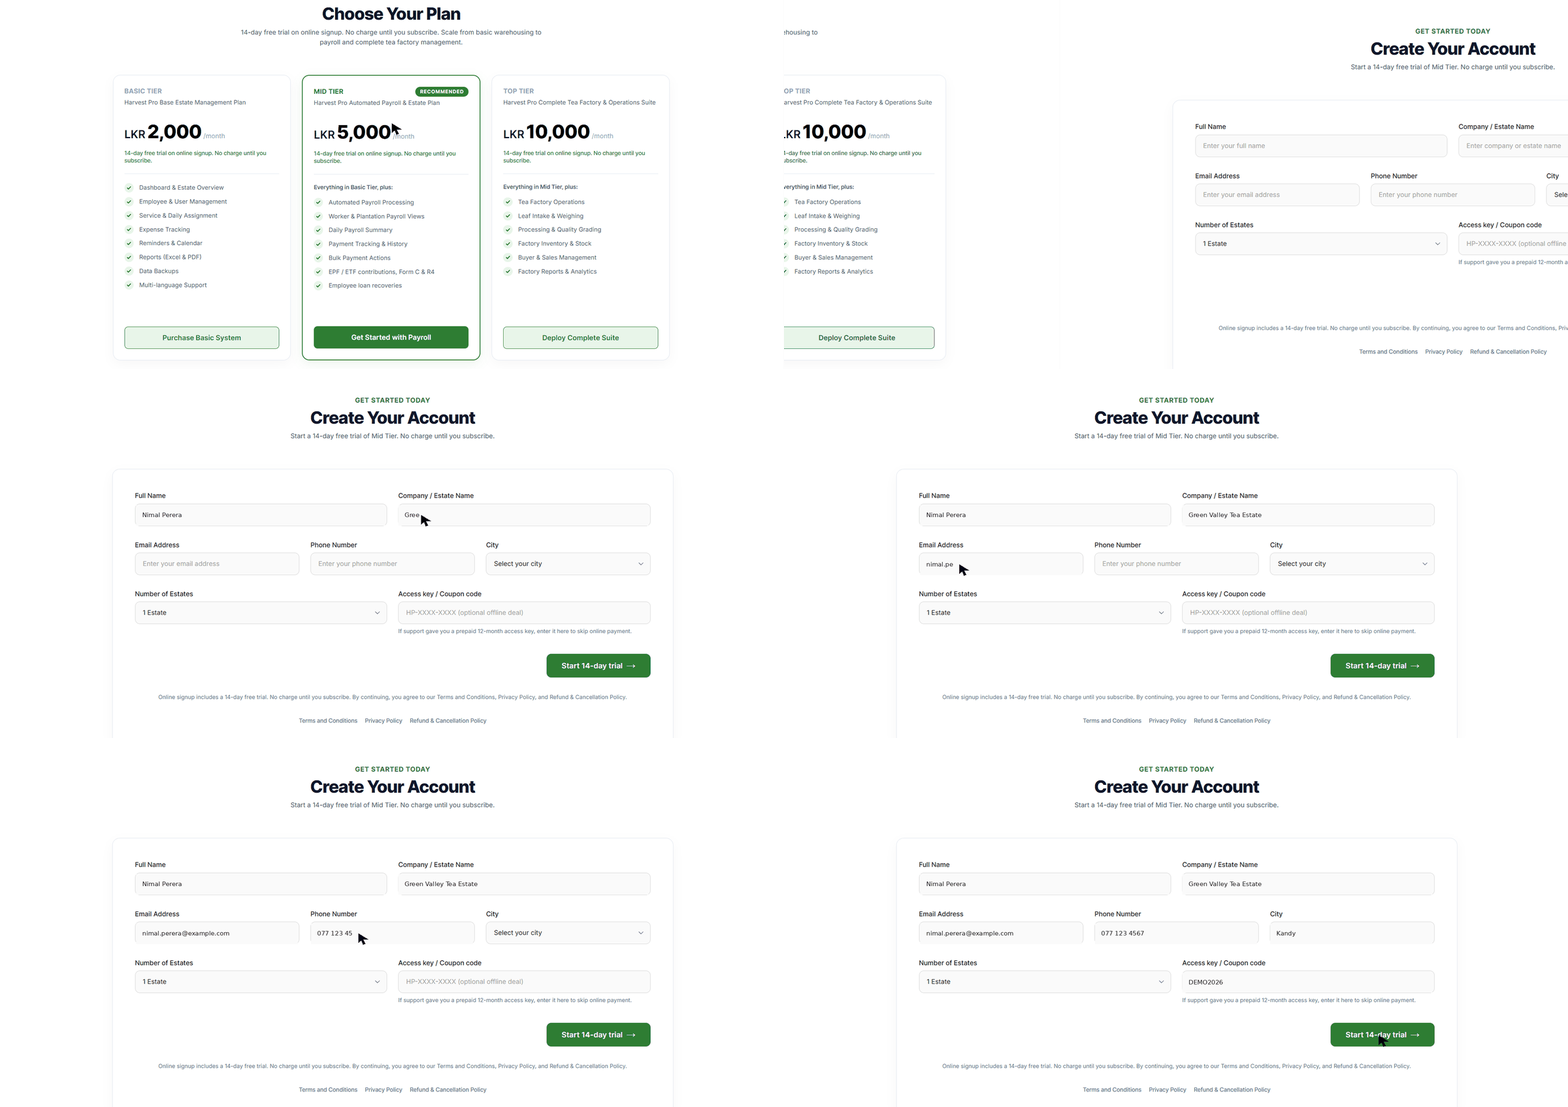
Sign up for Harvest Pro and start your 14-day free trial. It only takes a few minutes to create your account.
Visit Harvest Pro
Go to the Harvest Pro website and click Pricing from the main menu.
Choose Your Plan
Select the plan that best suits your estate: Basic Tier, Mid Tier, or Top Tier.
Get Started
Once you have selected your plan, click "Get Started with Plan".
Start Your Free Trial
Click "Start Your 14-Day Free Trial" to continue.
Fill in Your Details
Enter the required information, including your personal details, estate details, mobile number, and city.
Activate Your Trial
Check that all your information is correct, then click "Start 14-Day Trial".
Log In to Harvest Pro
Your account is now ready. Log in to the Harvest Pro system and start managing your tea estate.
You can use Harvest Pro free for 14 days before choosing to continue with your selected plan.
Estate Management
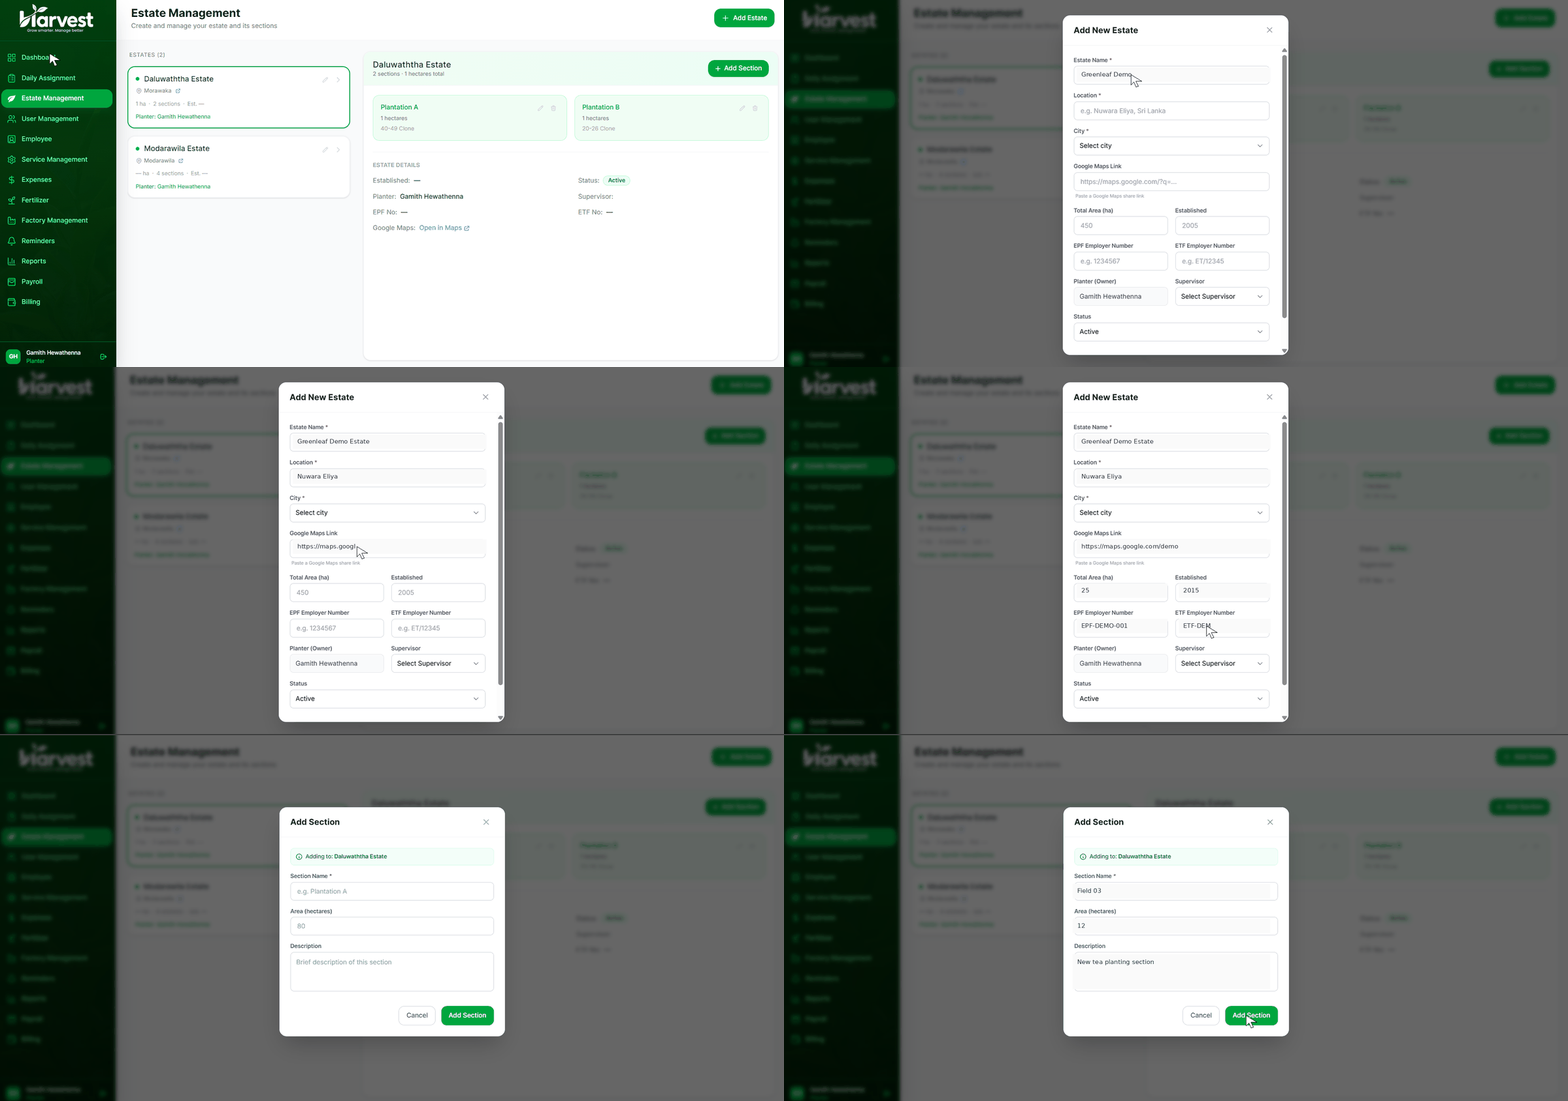
After logging in to Harvest Pro, the first thing you need to do is set up your estate.
Go to Estate Management
Click Estate Management from the system menu.
Select Your Estate
You will see the tea estate you added when creating your Harvest Pro account. Click on the estate name to open and manage your estate.
Add Another Estate
If you manage more than one tea estate, you can click Add New Estate. To add an additional estate, you will need to select and purchase a new subscription for that estate.
Add Sections to Your Estate
After selecting your estate, you can create the different sections or fields within your estate — for example, Field 01, Field 02, Field 03, New Tea Section, or Old Tea Section. Enter the section name based on how your estate is divided.
Once your sections are added, you can use them throughout Harvest Pro to organize and track your estate operations more accurately.
Service Management
Set up the labour services your estate offers, along with how each one is measured and paid.
Go to Service Management
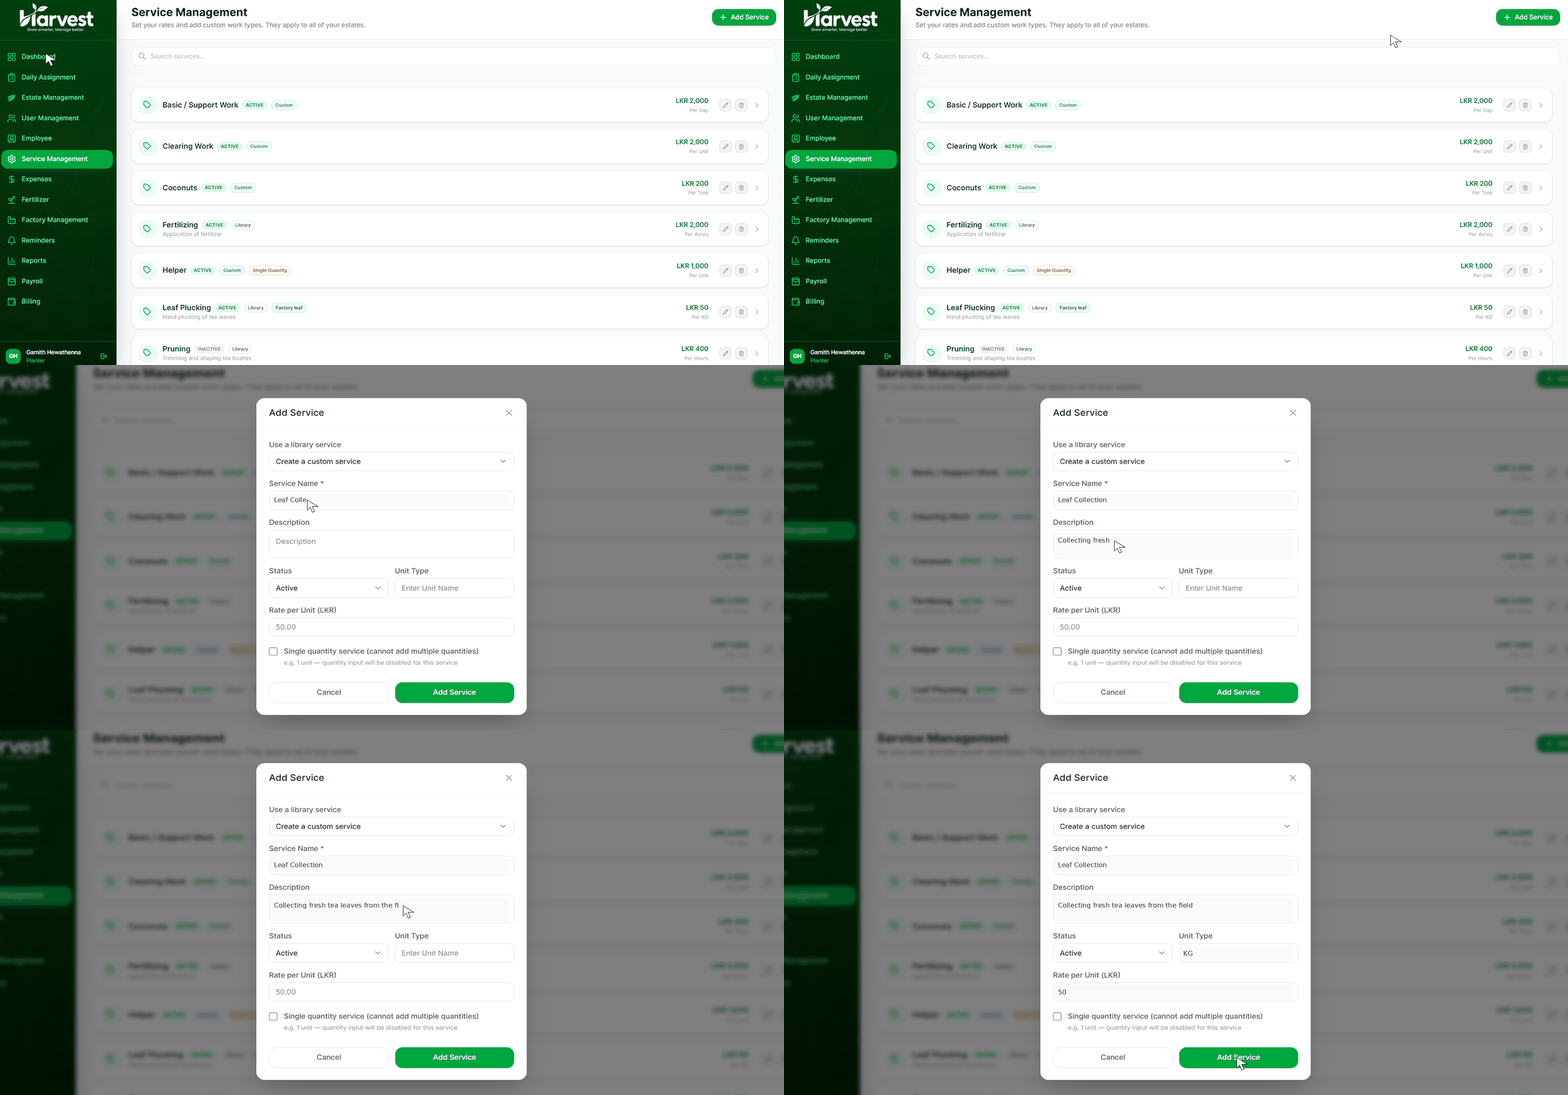
From the left-side menu, click Service Management.
Add a New Service
Click the Add Labour Service button at the top-right of the page. The Add New Service form will appear.
Enter the Service Name
Enter the type of work or service you want to add — for example, Leaf Plucking, Fertilizing, Pruning, or Weeding.
Add a Description
Enter a short description of the service if required.
Select the Status
Set the service status to Active if you want to start using it immediately.
Enter the Unit Type
Enter how the service will be measured — for example, KG for leaf plucking, Unit for an individual task, Tank for spraying, or Day for daily work.
Set the Rate per Unit
Enter the amount you pay for each unit. For example, if leaf plucking is paid at LKR 50 per KG, set Unit Type to KG and Rate per Unit to LKR 50. Or, if a worker is paid LKR 2,000 per day, set Unit Type to Day and Rate per Unit to LKR 2,000.
Single Quantity Service
Tick Single Quantity Service when the service should always be counted as 1 unit — for example, if you pay LKR 2,000 for one full day of work. The quantity field will then be disabled when assigning this service. Leave it unticked for services where the quantity can change, such as 10 KG, 25 KG, or 50 KG of leaf plucking.
Add the Service
Check the details and click Add Service.
Your new service is now ready to use when assigning work to employees in Harvest Pro.
Employee Management
Add your workers to Harvest Pro and assign them to the right services and estates.
Go to Employee Management
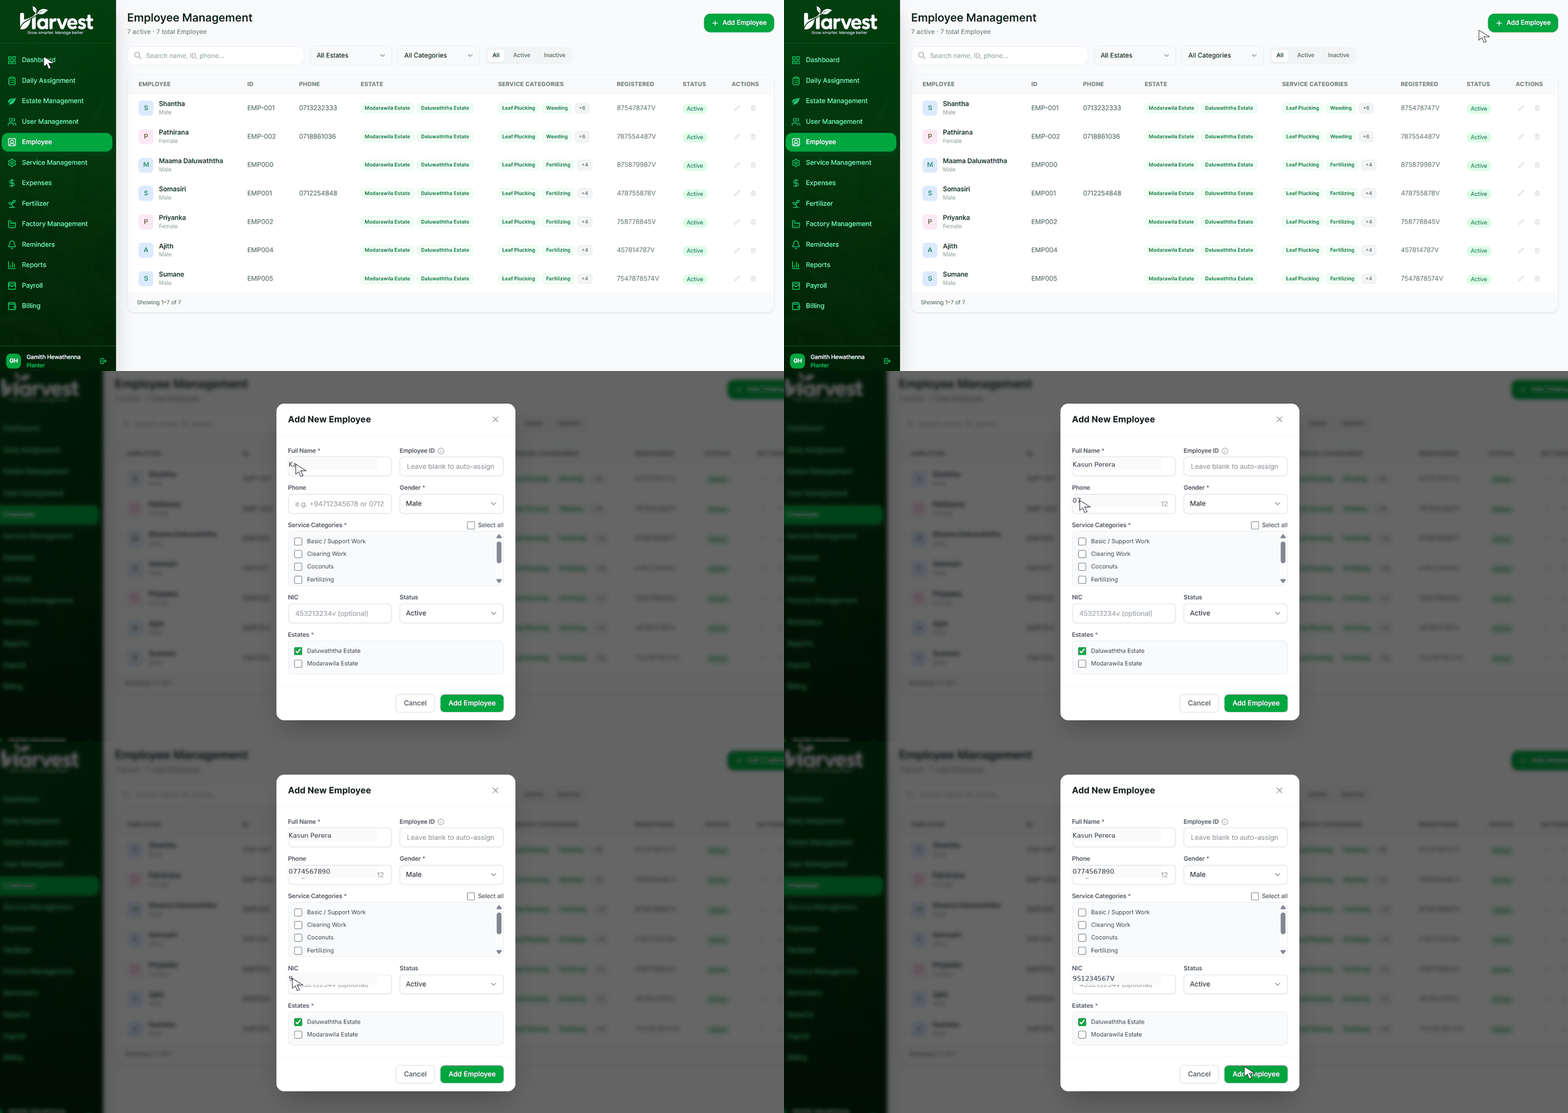
From the left-side menu, click Employee Management.
Add a New Employee
Click the Add Employee button at the top-right of the page. The Add New Employee form will appear.
Enter Employee Details
Fill in the employee's information, including full name, phone number, gender, NIC, and status.
Add Employee ID
The Employee ID can be automatically assigned by Harvest Pro if you leave the field blank. Alternatively, you can manually enter your own employee ID, such as the employee's ETF number.
Select Service Categories
Under Service Categories, select the services the employee can perform — for example, Fertilizing, Leaf Plucking, Pruning, or Weeding. These categories are based on the services you previously created under Service Management.
Assign the Employee to an Estate
Under Estates, tick the estate or estates where the employee works. You can assign an employee to one or multiple estates, depending on your requirements.
Add Employee
Check that all the information is correct, then click Add Employee.
The employee will now be added to your Harvest Pro Employee Management system.
Daily Assignment
Record the daily work completed by your employees and let Harvest Pro calculate their payments automatically.
Go to Daily Assignment
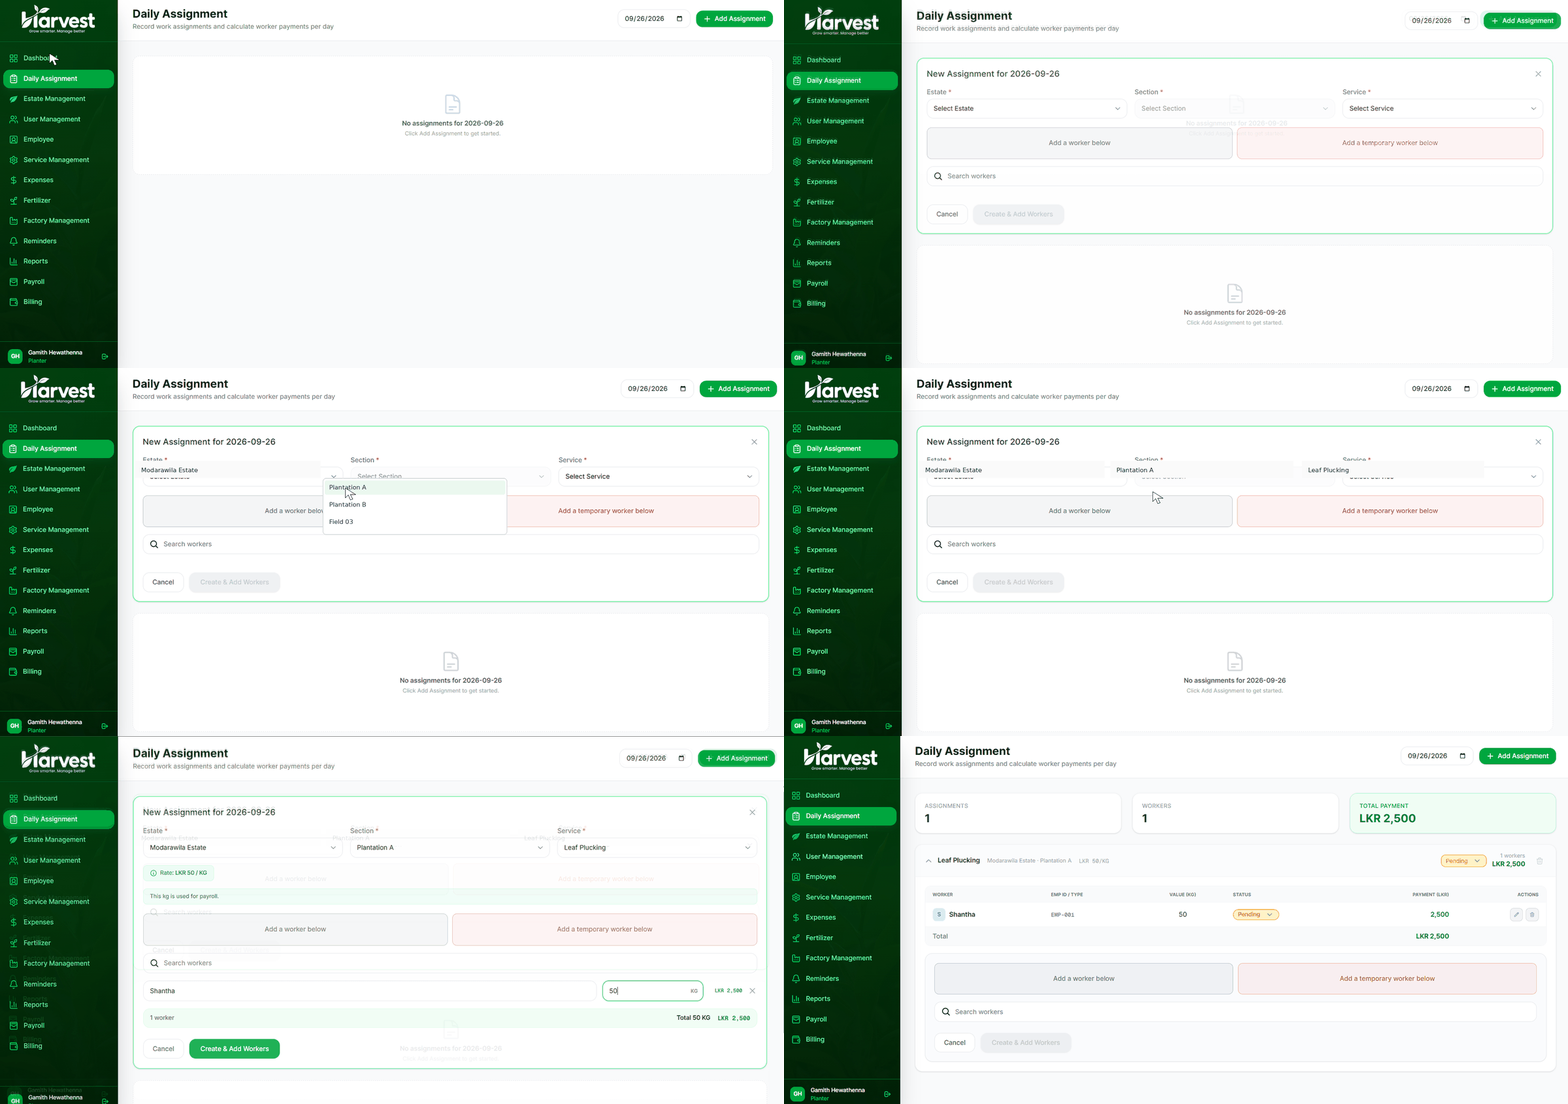
From the left-side menu, click Daily Assignment. This section allows you to record the daily work completed by your employees and automatically calculate their payments based on the service rate.
Add a New Assignment
Click the Add Assignment button at the top-right of the page. A New Assignment form will appear.
Select the Estate
Choose the estate where the work was carried out.
Select the Section
Choose the relevant section of the estate — for example, Field 01, Field 02, or Plantation A.
Select the Service
Select the service completed by the workers — for example, Leaf Plucking. The system will automatically display the rate you previously set under Service Management, such as LKR 50 per KG.
Add Workers
Click Add a Worker Below, then click the Search Workers field — your previously added employees will automatically appear. Select the worker you want to add. You can add multiple workers to the same daily assignment.
Enter the Work Quantity
Enter the quantity completed by each worker. For example, if a worker plucked 60 KG of green leaf, enter 60 KG. Harvest Pro will automatically calculate the worker's payment based on the rate: 60 KG × LKR 50 = LKR 3,000. This information will also be used for Payroll.
Add a Temporary Worker
If someone works only on a temporary or daily basis and is not registered as a regular employee, click Add a Temporary Worker Below to record their work for that day without adding them as a permanent employee.
Create the Assignment
Once all workers and quantities have been entered, check the details and click Create & Add Workers.
Your daily assignment is now recorded in Harvest Pro, including the workers, work quantities, and calculated payments.
Expense
Record and track all the expenses related to your tea estates.
Go to Expenses
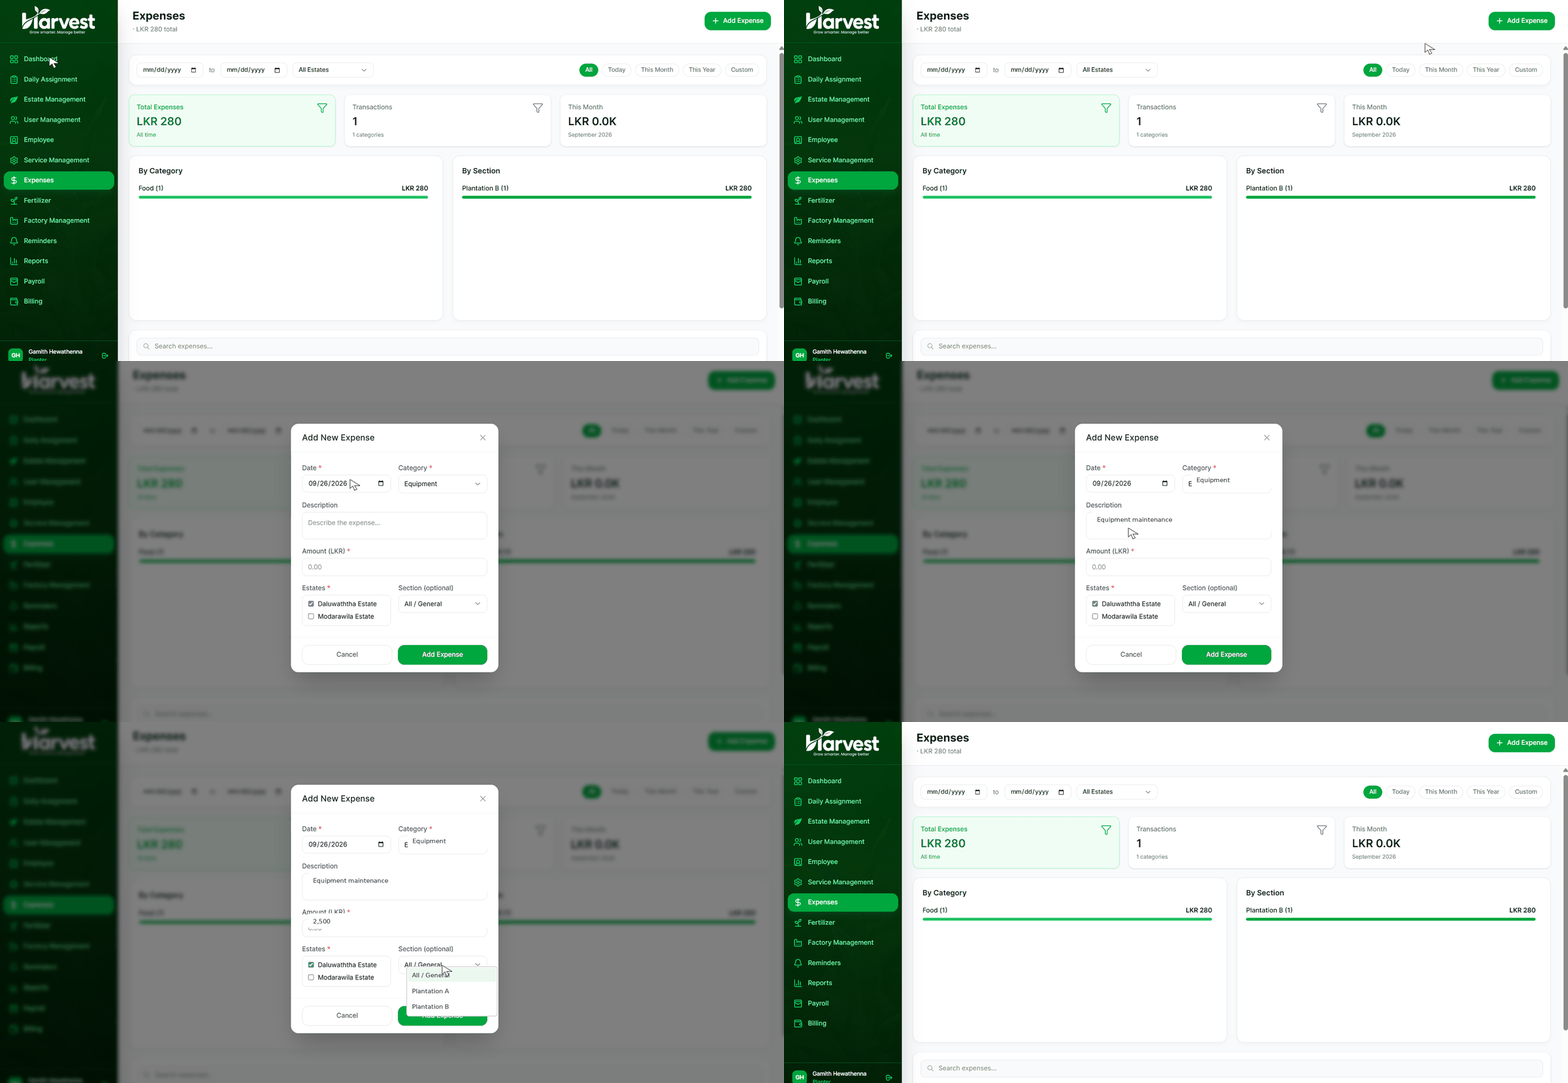
From the left-side menu, click Expenses. This section allows you to record and track all expenses related to your tea estates.
Add a New Expense
Click the Add Expense button. The Add New Expense form will appear.
Select the Date
Choose the date when the expense occurred.
Select the Expense Category
Choose the appropriate category for the expense — for example, Equipment, Food, Tools, Transport, Utilities, or Other.
Add a Description
Enter a short description explaining what the expense was for.
Enter the Amount
Enter the total expense amount in LKR.
Select the Estate
Select the estate related to the expense. If you manage multiple estates, you can record and track expenses separately for each estate.
Select the Section
If the expense belongs to a specific section or field, select it under Section. If it is a general estate expense, select All / General.
Add the Expense
Check all the information and click Add Expense.
The expense will now be recorded in Harvest Pro, helping you track estate expenses and costs accurately for each estate and section.
Fertilizer Management
Track fertilizer applications and cycles, and know exactly when each field is next due.
Go to Fertilizer Management
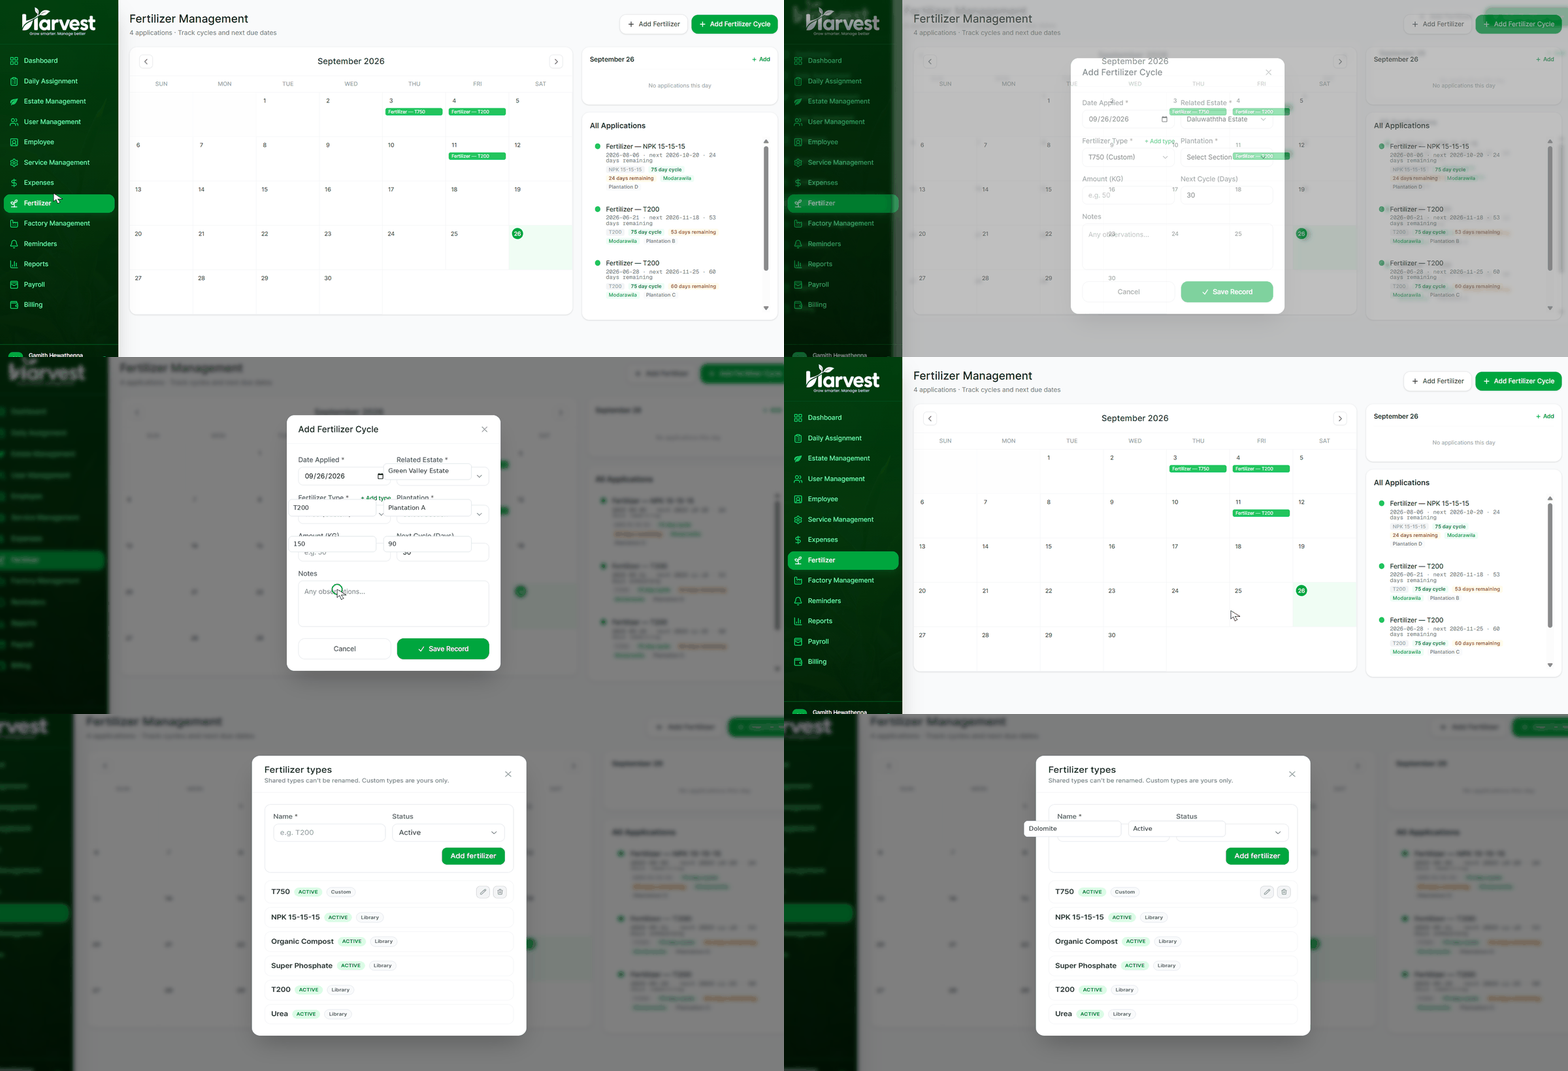
From the left-side menu, click Fertilizer Management. Here you can view the fertilizer calendar, applications, cycles, and upcoming due dates.
Add a Fertilizer
Click Add Fertilizer at the top-right of the page and add the fertilizer types you use on your estate — for example, T200, T750, NPK 15-15-15, or Urea.
Add a Fertilizer Cycle
Click Add Fertilizer Cycle to record a new fertilizer application and set its next cycle.
Select the Estate and Section
Select the estate where the fertilizer was applied, then select the relevant section or field — for example, Field 01, Field 02, Plantation A, or Plantation B.
Select the Fertilizer
Choose the fertilizer type you applied from your previously added fertilizer list — for example, T200.
Enter the Application Details
Select the application date and enter the amount of fertilizer used — for example, T200 at a quantity of 150 KG.
Set the Fertilizer Cycle
Enter the number of days before the next fertilizer application is required — for example, 50, 75, or 90 days. If you select a 90-day cycle, Harvest Pro will automatically calculate the next fertilizer due date.
Save the Fertilizer Application
Check all the details and save the application. The record will now appear on the Fertilizer Management calendar and under All Applications.
Track Next Due Dates & Reminders
Harvest Pro automatically tracks the fertilizer cycle and shows the last application date, next due date, cycle (e.g. 90 days), days remaining, estate, and section / field.
This helps you identify which field needs fertilizer next and when it is due, without manually calculating the dates.
Factory Management
Track green leaf deliveries, factory weights, monthly prices, and profit — from plucking to final payment.
Go to Factory Management
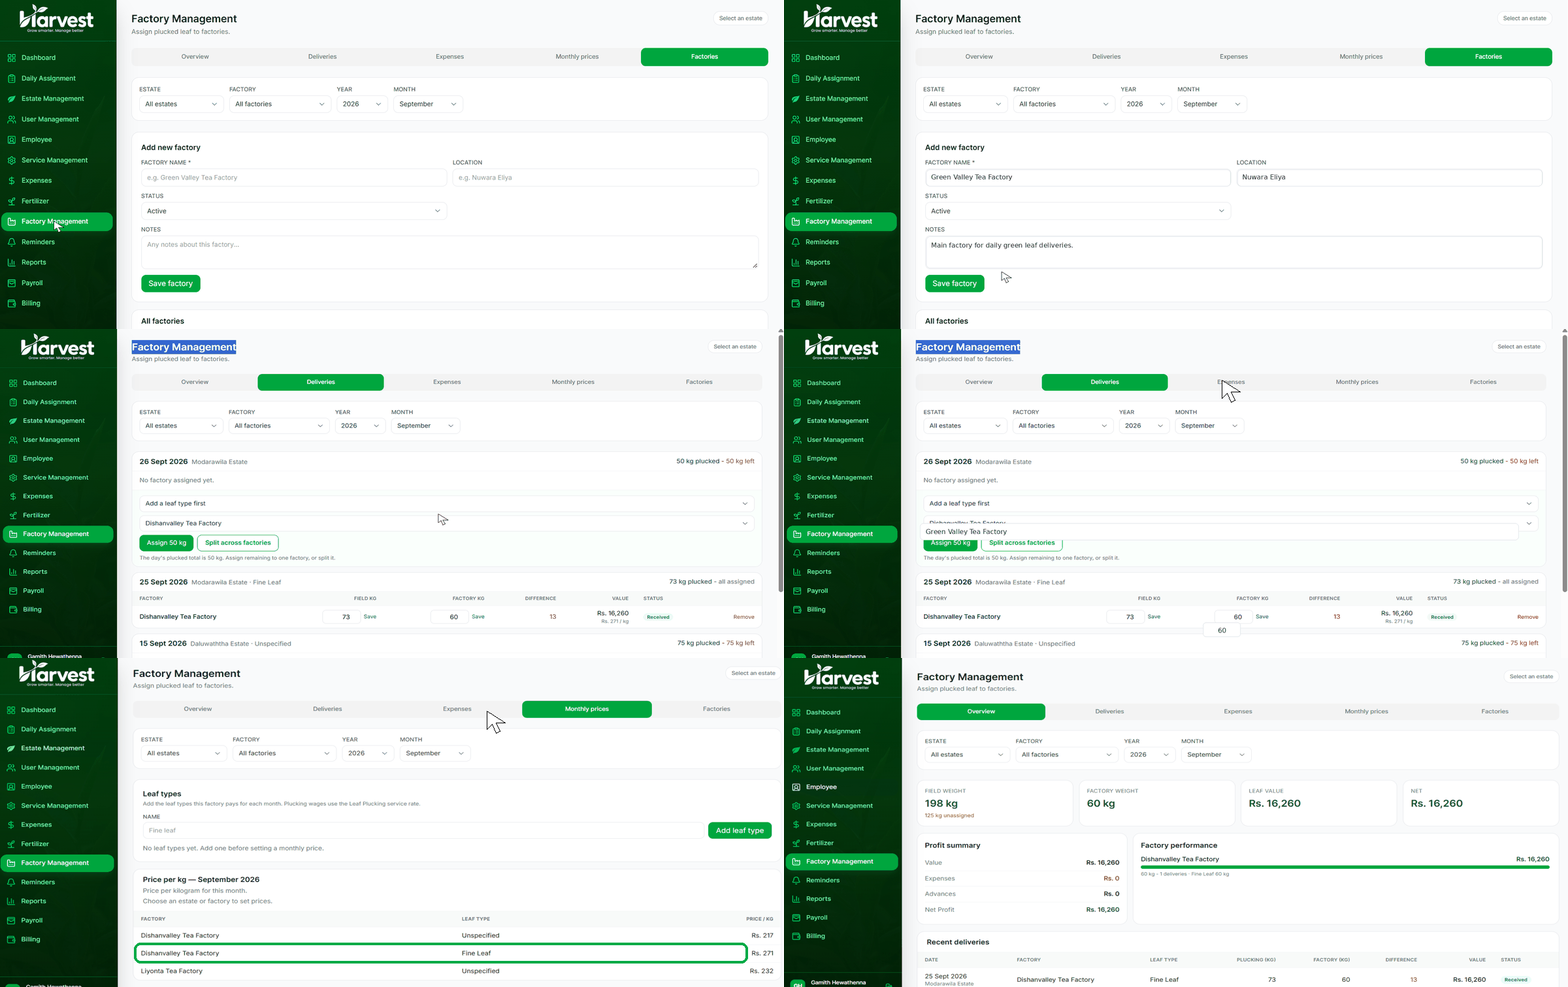
From the left-side menu, click Factory Management. You will see five tabs: Overview, Deliveries, Expenses, Monthly Prices, and Factories. When using Factory Management for the first time, start with the Factories tab.
Add Your Tea Factory
Click the Factories tab and enter the factory details: factory name, location, and status (select Active) — notes are optional. Click Save Factory. If you supply green leaf to more than one factory, you can add each factory separately.
Go to Deliveries
Click the Deliveries tab. The green leaf KG recorded from your daily plucking will automatically appear here. For example, if your workers plucked 150 KG today, the 150 KG will appear under Deliveries, ready to be assigned to a factory.
Assign the Green Leaf to a Factory
Select the factory where you delivered the green leaf. If all 150 KG went to one factory, assign the full 150 KG to that factory. If you delivered the leaf to multiple factories, click Split Across Factories — for example, 100 KG to Factory A and 50 KG to Factory B. This allows you to track exactly how much leaf was sent to each factory.
Check the Field KG
After assigning the delivery, you will see the Field KG — the weight recorded by your estate before the green leaf is weighed at the factory. For example, Field KG: 73 KG.
Enter the Factory KG
Once the tea factory provides its official weight, enter it under Factory KG — for example, Field KG: 73 KG, Factory KG: 60 KG. Save the factory weight after entering it.
Check the Weight Difference
Harvest Pro will automatically show the difference between the Field KG and Factory KG — for example, Field KG: 73 KG, Factory KG: 60 KG, Difference: 13 KG. This makes it easy to identify any weight difference between the estate and factory records.
Add the Monthly Price
Once the factory provides the green leaf price for the month, click the Monthly Prices tab. Select the relevant factory, month, and year, then enter the factory's price per KG and save it — for example, September: Rs. 271 per KG.
Check the Delivery Value
Go back to the Deliveries tab. Harvest Pro will use the Factory KG and the applicable Monthly Price to calculate the value of the delivery — for example, Factory KG: 60 KG, Price: Rs. 271 per KG, Value: Rs. 16,260.
Add Factory Expenses
Click the Expenses tab. Here you can record expenses or deductions related to the factory — enter the factory, date, category, amount (LKR), and an optional description or notes, then click Save Expense.
Record Fertilizer or Other Deductions
Sometimes the tea factory may provide fertilizer or other items/advances to your estate. For example, if you receive fertilizer from the factory and its cost will be deducted from your month-end payment, record that amount under Factory Expenses. This helps you keep track of the deductions that will affect your final factory payment.
Go to Overview
Click the Overview tab to see a complete summary of your factory activity. You can filter the information by estate, factory, year, and month.
Check Your Factory Summary
At the top of the Overview, you can see the Field Weight (total KG recorded by your estate), Factory Weight (total KG recorded by the factory), Unassigned KG (leaf that still needs to be assigned to a factory), Leaf Value (value calculated using the factory KG and monthly price), and Net (final value after applicable recorded deductions).
Check the Profit Summary
Under Profit Summary, you can see the Value, Expenses, Advances, and Net Profit — giving you a clear picture of the income generated from your green leaf and the deductions recorded against it.
Check Factory Performance
The Factory Performance section helps you monitor the performance of each factory. You can see the KG supplied, number of deliveries, leaf type, and value for the selected period. This is especially useful if your estate supplies green leaf to multiple factories.
Check Recent Deliveries
Under Recent Deliveries, you can see the date, factory, leaf type, plucking KG, factory KG, difference, value, and status — helping you quickly review your latest factory deliveries and confirm that the information has been recorded correctly.
Once Factory Management is set up, your normal process will be: Record Daily Plucking → Assign Leaf to Factory → Enter Factory KG → Add Monthly Price → Check Delivery Value → Add Factory Expenses/Deductions → Check Overview & Net Profit.
Reminders & Calendar
Schedule and track important activities across your tea estate — from fertilizer applications and inspections to maintenance, purchasing, and meetings.
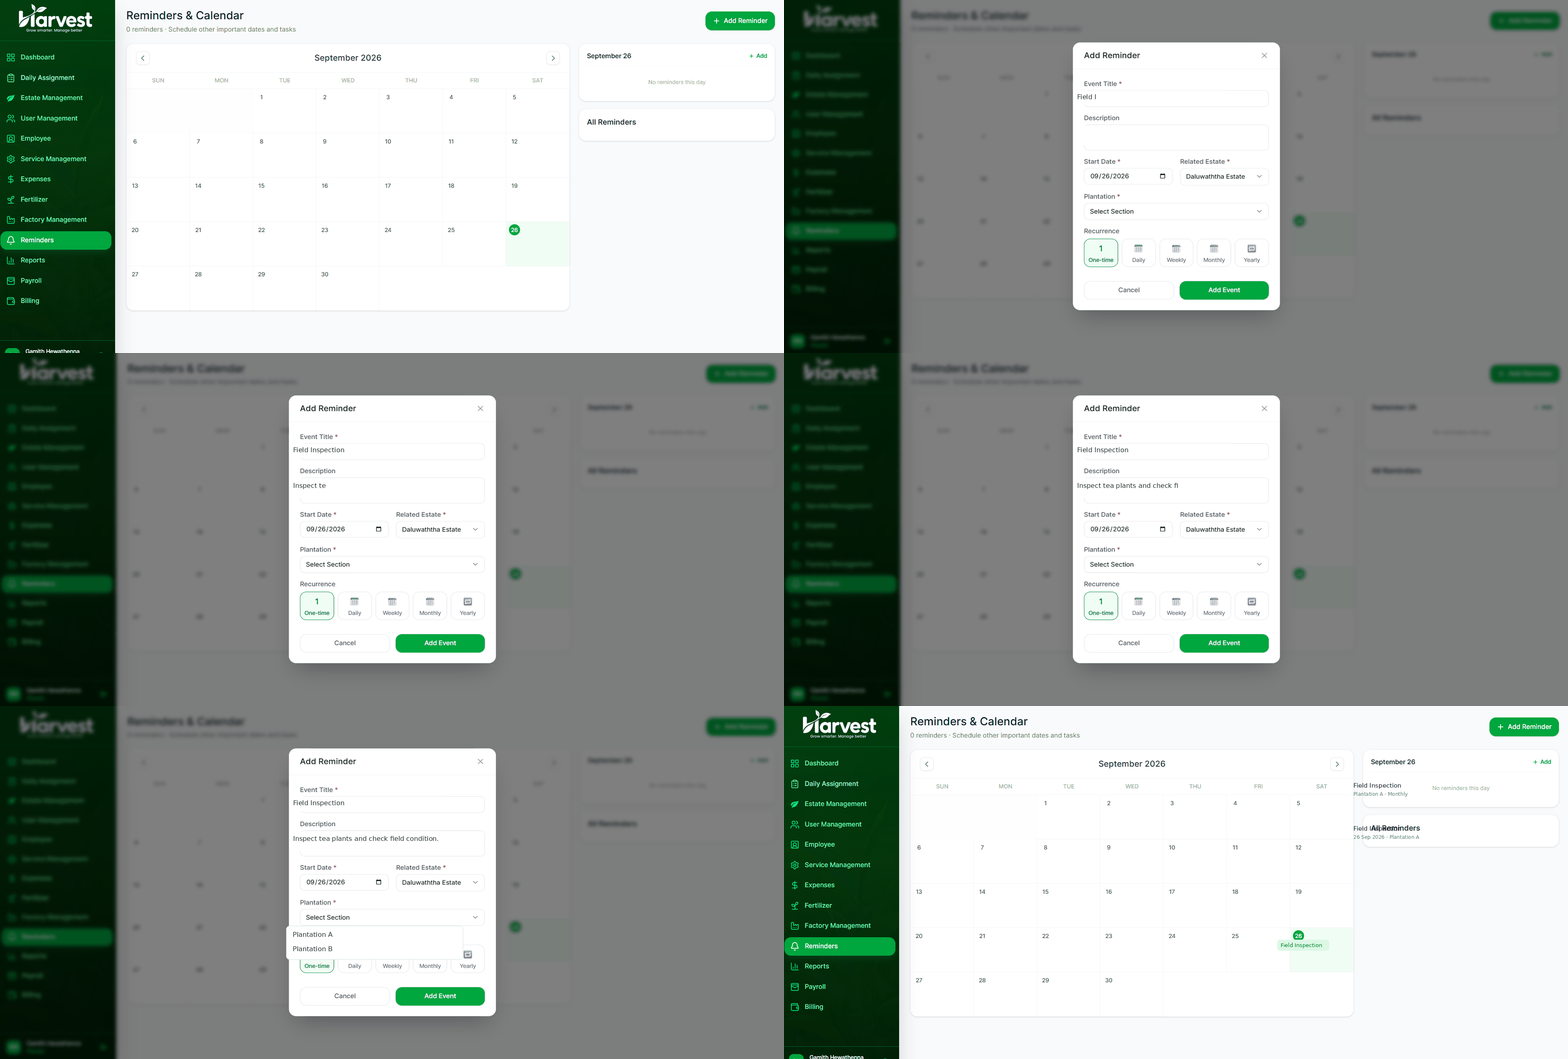
Go to Reminders & Calendar
From the left-side menu, click Reminders & Calendar. You will see a calendar where you can view your scheduled reminders and upcoming estate activities.
Add a New Reminder
Click the Add Reminder button at the top-right of the page. The Add Reminder form will appear.
Enter the Event Title
Enter a clear event title for the activity you want to remember — for example, Apply Fertilizer, Building Maintenance, Field Inspection, Purchase Estate Supplies, Equipment Service, or Worker Meeting.
Add a Description
Enter a short description with more information about the task — for example, "Building Maintenance: Check and repair the estate office roof." This helps you understand exactly what needs to be done when you see the reminder later.
Select the Start Date
Choose the start date for the reminder — the date when the activity should take place or when you want the reminder to begin.
Select the Related Estate
Choose the estate related to the reminder. If you manage multiple estates in Harvest Pro, make sure you select the correct estate.
Select the Plantation / Section
Choose the specific plantation or section where the task needs to be completed — for example, Plantation A, Plantation B, Field 01, or Field 02. This makes it easier to manage reminders separately for different areas of your estate.
Select the Recurrence
Choose how often the reminder should repeat: One-time, Daily, Weekly, Monthly, or Yearly. For example, if you need to carry out an estate inspection every month, select Monthly.
Add the Event
Once all the information is correct, click Add Event.
View Your Reminders
Your scheduled activities will appear on the calendar according to their dates. You can also check the All Reminders section to keep track of your scheduled tasks and upcoming activities.
Using Reminders & Calendar helps you keep important estate activities organized and reduces the chance of missing scheduled work or important dates.